Do you use Drip as your email marketing automation tool? Our clients love it.
The automation. The possibilities!
There’s a lot you could do with Drip, but you’re probably wondering what you should do with Drip. Is this you? Well, I’ve got a treat for you today (several treats, actually).
My goal here is to help you build a strategy to put Drip to use when it comes to building out your marketing funnel.
Below, you’ll find:
- A guide and framework you can use to build your own automated funnel in Drip.
- A bonus 10-step process and cheatsheet you can download and follow right now when you’re setting up your Drip account.
A Quick Note
- Drip automations alone won’t complete your funnel. You’ll need quality, relevant content assets to send to your subscribers. At Audience Ops, we’ve built our content assets over the past 2+ years, and we continue to produce new assets that we work into our automated funnel.
Nurture With Content
Let me expand on that point. The whole point of using a tool like Drip isn’t to create workflow diagrams that look pretty (although I must say, an embedded decision tree with forks, triggers, and goals sure is sexy).
The point is to nurture your subscribers with content so that they eventually become leads and customers for your business. Otherwise, you’re just sending sales pitches to their inboxes, which will only drive your people to unsubscribe and never return to your site again.
Having the power of behavior-based email automation can be both a blessing and a curse. On the one hand, you want to put that engine to work. But you don’t want it to backfire.
Here are five types of content assets you’ll want to have in place (and continuously produce). With high-quality material tailored for your audience, your subscribers will be eager to open—and act upon—the emails they receive from you your automated system.
Evergreen Blog Articles
Your blog content serves multiple purposes in your marketing funnel:
First, it helps you attract a steadily growing stream of organic traffic from search, social media, and referrals. This is especially true of “evergreen” articles, which are designed to provide value to readers all year long and beyond. They should be educational, insightful, and highly relevant to your best customers, without being date-specific or news-oriented.
You can accelerate the process of growing traffic for your blog content by running paid ad campaigns to promote your best blog articles. In fact, in our tests, we found that the lowest cost-per-click came when pointing ads to free, pillar blog articles—not landing pages, sales pages, webinars, or anything else.
Your articles also serve as free, valuable material that you can send as email newsletters to your subscribers. Doing so provides a great reason for your subscribers to come back to their inboxes on a weekly basis, without coming off as too pushy or salesy. Don’t just send them on the day they publish. Recycle your best performing articles in evergreen email campaigns so that new subscribers always receive your best stuff.
Finally, by growing your archive of evergreen blog articles, you’re growing the number of entry-points where casual visitors can join your email list. Namely, through the use of…
Content Upgrades
Content Upgrades are specific pieces of downloadable bonus content that are offered along with a specific blog article, in exchange for the visitor’s email address.
For example, if you have an article about best practices for higher-converting checkout pages, you might offer a checklist of 10 optimizations you can make to your checkout page today. The Content Upgrade should be something useful, actionable, and highly relevant to the topic of the article it came with. I recommend creating a unique Content Upgrade for every evergreen blog post you publish.
Speaking of—now is probably a good time to tell you about the Content Upgrade I created for this post. It’s a 10-step checklist and framework for setting up your automation workflows in Drip. Here ya go:
Lead Nurture Piece(s)
You’ll need a way to move someone from being a casual reader or email subscriber, into a lead and potential customer ready to make a buying decision.
This is where your lead nurture piece(s) come into play. Examples of lead nurture pieces might be a multi-day email crash course (dripped out as a Campaign in Drip), a downloadable eBook, or a live or recorded webinar.
Don’t make the mistake that most businesses do, which is to think that simply increasing the word count or length of the piece will result in a waterfall of leads and conversions.
Here are a few strategic tips to follow when assembling your lead nurture piece(s):
- The topic should be aimed at the specific problem that your product or service solves for customers. That doesn’t mean make it all about your product. It means make it all about the underlying business problem that gives your product a reason to exist.
- It should be genuinely helpful for readers—even if they don’t end up buying your product. Leverage your unique insight, perspective, and opinion in the way you teach best practices.
- After the educational portion of the lead nurture piece, there should be a short pitch for your product, positioning it as the next logical step to killing this business problem for good.
- After a person accesses your lead nurture content piece, you should have an automated follow up with one to three emails that reinforce the value, unique benefits, and connection between the problem and your product.
Sales Information Material
Next, we come to the material that potential customers can use to learn about your product and the specific answers to their questions as they make their buying decision.
Examples of sales information assets could be pricing charts, product demos (recorded or live), free samples, product tours, answers to frequently asked questions, etc.
It’s not enough to lay all of this information out on your website for your leads to find on their own. They probably won’t find and read every last word. And if they have incomplete information, this will only delay (or prevent) them from pulling the trigger on buying your product.
What I recommend is to send the key bits of sales information material when they are most relevant to a particular subscriber: As soon as they’ve become a “lead” for your business. I define a “lead” as someone who has taken an intentional step toward potentially buying your product. They’re raising their hand to say, “I’m considering a purchase in the near future”.
In our case at Audience Ops, we consider a person a “lead” when they request a consultation by filling out the form on our homepage. Your business might consider a lead to be someone who has signed up for a free trial or downloaded a demo.
This action should trigger a series of emails aimed at surfacing the most relevant and helpful information to help your customer make a more informed buying decision. Our lead follow-up material includes a mix of case studies about other customers, showing behind-the-scenes processes our team uses when we work together, answers to common questions about our service, and other bits of information.
Activation Content
Most businesses will benefit from having some automated content aimed at customers who’ve recently made their first purchase. The goal of this content could be to drive retention or repeat sales. Or it could be to encourage your customers to recommend your product to others.
Examples could be educational pitches for related products or upsells, asking customers to fill out a survey, inviting customers to a private community, and so on.
Through a mix of Drip workflows, campaigns, automation rules, and one-off emails, you can ensure that all subscribers are funneled into the right content pieces at the right time, depending on how far they’ve made it through your funnel.
Drip Tips & Best Practices
I want to give you a few tips I built up through working with Drip these past few years.
Don’t confuse this with specific docs on how to use Drip. For that, check out Drip’s Knowledge Base or contact their customer support (they’ve always been super helpful in my experience).
I’ll break my tips down by the main features within Drip:
Workflows
- Workflows are best used for automations that are triggered by a specific event(s) and then have multiple steps, decisions, or actions that need to be applied.
- I tried both extremes: Building a single, super-long workflow to cover all possible automation flows vs. lots of smaller workflows that trigger one another. I found a middle-ground to be the best approach: A small set of three to six workflows, each managing a key “arm” of my automation system. This has been the most manageable, especially when dealing with frequent tweaks and updates (when I was using either of the extremes, small tweaks to automation steps caused other things to break unknowingly).
Here’s what my set of Workflows for my Audience Ops Drip account look like at the time of this writing:

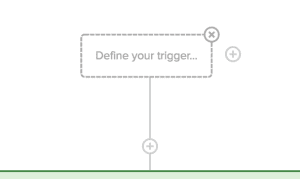
- It’s perfectly fine to create a Workflow that doesn’t have an initial trigger at the top (leave it blank). This can be useful if you intend for this Workflow to be triggered from within another workflow or an automation rule. Just keep in mind my previous tip: Don’t let your list of Workflows get unwieldy, as this can become very hard to manage, and highly error-prone as well.
- Keep in mind that subscribers in a workflow can only ever move downward in that workflow. When they achieve a Goal located further down in the workflow, this “pulls” the subscriber down to it, skipping whatever steps came before it. Goals above the subscriber’s current location cannot pull the person back up in a Workflow.
- Remember to insert enough “Delays” in between certain steps in your Workflows (I often forget to do this). Oftentimes, you don’t want a person to receive emails back-to-back or within just a day of the previous one.
- Unlike Campaigns, which will typically only send to a subscriber once, a person can move through a Workflow multiple times during their time on your list. But keep in mind that they can’t move upwards or restart a Workflow that they’re currently in.
Automation Rules
- Since the Workflows feature was introduced, the need for Automation Rules has been greatly reduced. You probably don’t need very many Rules in place, since actions are typically handled in Workflows. But there are a few cases where it makes more sense to use a “flat” Automation Rule, instead of a Workflow.
- Good uses of Rules would be things that may happen anytime, unexpectedly, with unknown triggers. For example, you might want to apply a tag whenever someone visits a particular page on your site.
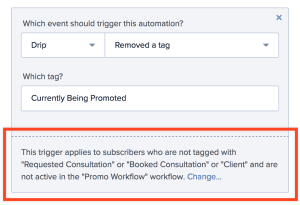
- Sometimes the simplicity of Rules can be deceiving. By default, they apply to everyone, but that might not be desired. Use a “Filter” on Rule triggers to exclude certain groups from being affected by a Rule. For example, I have some rules that only apply to non-customers and people who’ve never become a lead before.
Campaigns
- Campaigns are the tool to use when you have a series of multiple emails to send. Good use cases for Campaigns would be a multi-day email course or a sequence of follow-up emails after a webinar (both of these are Campaigns I incorporated in our Drip account).
- If you want more control over the individual emails within a campaign, for example skip an email if a subscriber has already seen that content, you might opt to build a Workflow instead of a Campaign. That workflow can include a series of “one-off” emails wrapped in Decisions. I use this pattern for our short series of emails to promote our “Pillar Articles”. That pattern looks like this:
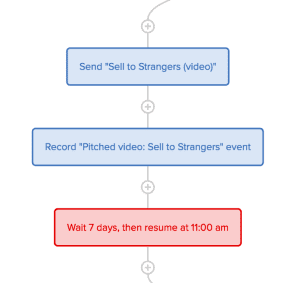
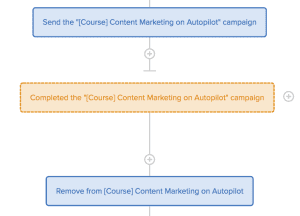
- Be sure to remove subscribers from a Campaign after they’ve completed it. Drip will not do this automatically! The reason this is important is that if you add emails to the Campaign later on, any subscribers who are still subscribed to it will be sent those newly added emails immediately. If it’s been months since they received the last email in the sequence, it can be an awkward, unwelcome message hitting their inbox. So when adding a Campaign to a Workflow, be sure to immediately follow it by a Goal of completing that campaign, then follow that by an action to remove the person from the Campaign. It should look like this:
Broadcasts
- If Workflows, Rules, and Campaigns trigger and send emails to subscribers automatically, Broadcasts are the opposite of that. You’d use Broadcasts to send a one-time email blast, like a timely newsletter, to some (or all) of your subscribers.
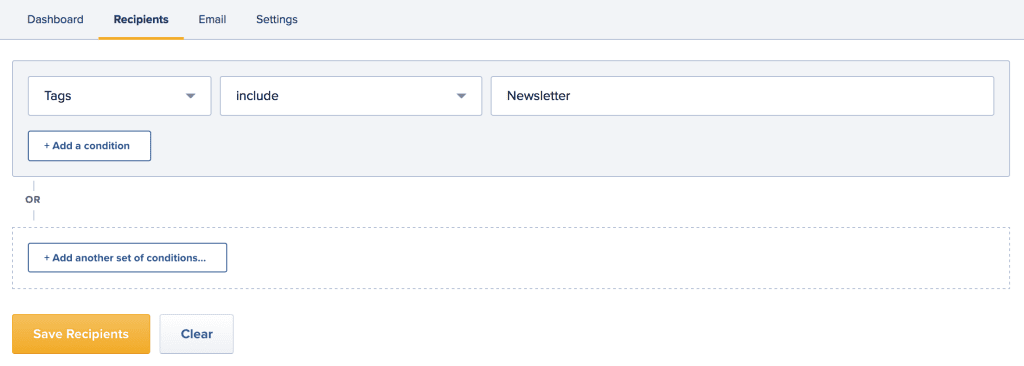
- I suggest creating a tag, like ‘Newsletter’, and applying this to anyone who should be eligible to receive a live Broadcast newsletter from you. Apply it to subscribers only after they’ve completed your automated Workflows & Campaigns. In my workflows, the ‘Newsletter’ tag is applied as the very last step after I’ve sent or pitched all of our key content via workflows. Then, when we send a live Broadcast newsletter, we set the recipients of that Broadcast to only people who have the ‘Newsletter’ tag, like this:
- Unlike “evergreen” content that you’d send through Workflow emails and Campaigns—which may hit a subscriber’s inbox anytime throughout the year—Your Broadcast emails can be more timely or news-oriented. Feel free to wish subscribers a happy holiday if you’re sending in December, or announce your summer sale in July. Just remember, if you repurpose a Broadcast newsletter later by adding it to an Evergreen Campaign, be sure to edit the copy to make it “evergreen.”
Tags
- Everyone has their own preferences when it comes to using Tags and naming conventions for them. The most important thing is to choose a convention that makes sense to you (and your team), and one that’s easy to work with in the future.
- I prefer to keep my Tag names simple and descriptive. I don’t use abbreviations or product codes, etc. A few examples of Tags in our Drip account are:
- “Client” (indicates this person is a paying client of Audience Ops)
- “Requested Consultation” (indicates this person has become a lead)
- “Content Upgrade” (they’ve downloaded a Content Upgrade)
- “Currently Being Promoted” (they’re currently midway through a series of promotional emails)
- “Newsletter” (they should receive live newsletter Broadcasts)
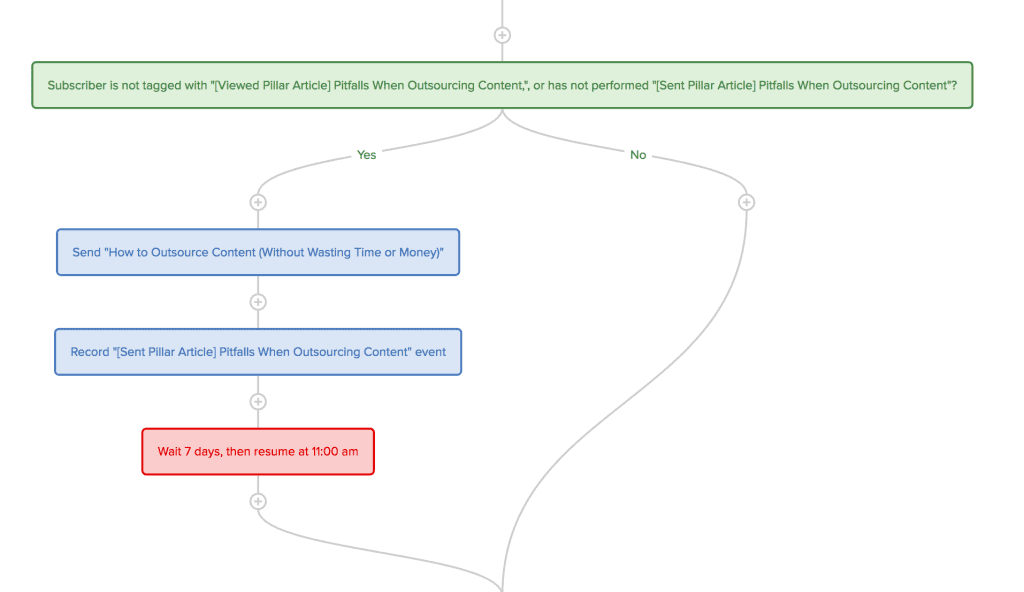
- I try not to overuse Tags. In many cases, recording an “Event” is a better choice. For example, I record an Event when I send a person a pitch for our email course. Then I can use the occurence of that Event as a filter in a Workflow Decision. For example, here I have a Decision that says, If this person has received the email course or has been pitched this email course, then don’t send it. Otherwise, do go ahead and send it just this once:

Forms
- You probably shouldn’t have too many Forms in your Drip account. It depends on how complex your site and funnel are, but in most cases, just three to five Forms should suffice.
- If you’re creating Content Upgrade forms on every blog post (which we recommend and do), these can add many Forms, which can be tedious to setup and hectic to manage over time. That’s why we built our own WordPress plugin to handle the creation of Content Upgrade forms, delivery of the bonus download, and automatic syncing of those subscribers into your Drip account.
- I suggest you do not use the “Rules” feature that is built into each Form. I prefer to keep all Rules in one place, in Automation > Rules or in Workflows. Having Rules hidden away in various Forms can make things difficult to manage later.
Lead Scoring
- To be honest, I thought I’d use the Lead Scoring feature more than I do, but I have basically left it untouched. Since leads clearly identify themselves when they take an action like filling out our consultation form or downloading our free samples, I don’t need the scoring feature to track that for me. I can simply tag them and trigger the emails I want them to receive once they become a lead.
- Lead Scoring can be useful if you have a large backlog of articles, and you want to do manual outreach to anyone who has read more articles than usual lately. You can set up an automation that says once a person reaches a Lead Score of, say, 50, send yourself a notification with their contact info.
Building Your Funnel in Drip: Where to Begin?
So I showed you what my funnel looks like in our Drip account for Audience Ops. And I gave you my tips for working inside the Drip platform.
But where should you begin when building out your marketing funnel?
Obviously, every business is a bit different. The way you structure your Drip workflows will depend on the type(s) of product(s) you sell and which content assets you’ve created (or are in the process of creating).
That said, I want to give you an approach you can take to get started and gain momentum so you can stand up your Drip automation system sooner rather than later.
Here’s the basic process:
- Define your overall business goal.
- Take an inventory of all the “Entry Points” on your site where visitors can join your list.
- Take an inventory of all your content assets and which one(s) are most relevant for converting readers into leads.
- Start with a basic “Catch All” workflow, then branch out from there.
- Use your mouse to slowly “walk through” your Workflows, ensuring all steps are accounted for, and there are enough Delays, destinations, and filters in place.
- Keep refining and iterating as you learn what’s working and what’s not!
For a more detailed process to follow and use as you build out your Drip system, download the cheatsheet I put together for you here:
Need quality content assets, articles, and lead magnets to fill out your Drip campaigns? Audience Ops is here to help.